BLOG

5 Juicing & Smoothie Recipes to Kickstart Healthy Habits

My first-born would eat anything I put in front of him, from eggplant to tofu, he would happily try anything when he was little.  As our family has grown in children, so has their pickiness.  Though my third child at two is just now cooperating with eating vegetables, I've not really worried too much when she was rejecting the hard vegetables at 18-months.  My trick has always been to load up the vegetables in smoothies and more recently, I've tried juicing for even more vegetable variety without any complaints on pulp that now come from the oldest child.

A friend of mine from Hawaii, Blake Brutus La Benz, has done a lot of juicing and smoothies this year, and always makes posts of pictures and video on his social media to encourage others to live healthy. Though I've shared some smoothie recipes we use in our house, Acai Smoothie, Vitamin C U Later Sickness Smoothie, and Immunity Packed Pumpkin Smoothie, I was so excited when Brutus generously shared some of his personal recipes for you all. And if you think his name sounds familiar, you might be right.  We've shared about his fame in the list made about the 36 Best things about Hawaii, check him out

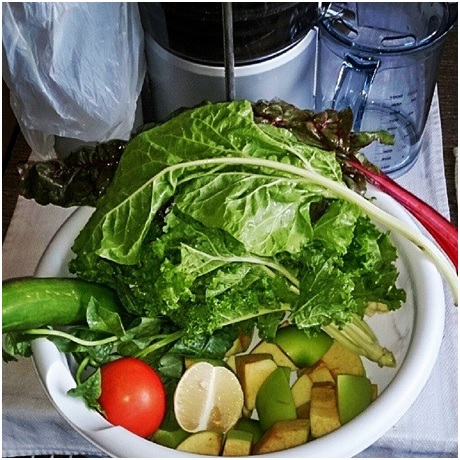
Chard-a-licious: A Juice Recipe: By Brutus

Any type of juicer can be used.  For best results, chop larger/wider items into smaller pieces.  For leafy greens, fold the stem into the rest of the leaf and roll leaf tighter before inserting into juicer.  Once juicing is complete, stir well to mix the layers of juice, and enjoy!  Makes between 20-30 ounces.

-4 big leaves of chard (any color)

-4 carrots

-1 medium beet (beet greens optional)

-half lemon

-half orange

-half medium tomato

-half large cucumber

-1 granny apple


Collardy Apple: A Juice Recipe: By Brutus

Any type of juicer can be used.  For best results, chop larger/wider items into smaller pieces.  For leafy greens, fold the stem into the rest of the leaf and roll leaf tighter before inserting into juicer.  Once juicing is complete, stir well to mix the layers of juice, and enjoy!  Makes between 20-30 ounces.

-7 collard leaves

-3 granny apples

-2 celery stalks

-half lemon

-half large beet (red or golden)


Green Goodness: A Juice Recipe: By Brutus

Any type of juicer can be used.  For best results, chop larger/wider items into smaller pieces.  For leafy greens, fold the stem into the rest of the leaf and roll leaf tighter before inserting into juicer.  Once juicing is complete, stir well to mix the layers of juice, and enjoy! Makes between 20-30 ounces.

-3 medium leaves of chard

-4 or 5 medium leaves of kale

-1 medium cucumber

-1 medium tomato

-2 granny apples

-half lemon

-1 handful of spinach


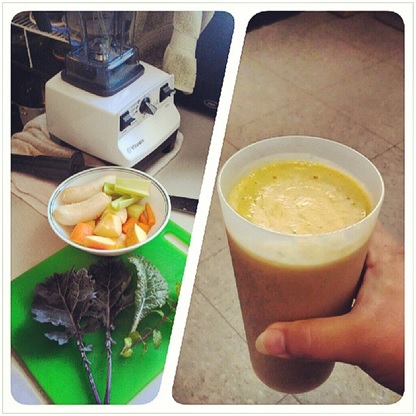
Kalepaya: A Smoothie Recipe: By Brutus

Any type of blender can be used, although I find that the premium blenders (Ninja, Vitamix, etc.) make much smoother smoothies.  Remove seeds and rinds from fruits and vegetables as desired; and use organic or local produce whenever possible.  Makes approximately 25-30 ounces.   Enjoy!

-half medium papaya

-half orange

-2 medium leaves of kale

-1 banana

-1 level table spoon chia seeds

-8 to 10 ice cubes

-1 cup water


Mint-Anana-Kale: A Smoothie Recipe: By Brutus

Any type of blender can be used, although I find that the premium blenders (Ninja, Vitamix, etc.) make much smoother smoothies.  Remove seeds and rinds from fruits and vegetables as desired; and use organic or local produce whenever possible.  Makes approximately 25-30 ounces.  Enjoy!

-3 medium leaves kale

-2 small/medium banana

-1 stalk celery

-1 medium carrot

-1 apple

-1 4-inch mint stalk and leaves

-8 to 10 ice cubes

-1 cup of water

Pumpkin Pie Spice Playdough

With the arrival of fall, it seems we're surrounded by all things pumpkin.  I'm adding it to smoothies and love using pumpkin in our Pumpkin Pie body scrub, due to its high levels of Vitamin A. 

Topically, the University of Maryland Medical Center has said that Vitamin A helps "help repair skin damage due to sunburn and natural aging, such as fine wrinkles, liver spots, and rough skin."  So, I'm even using this body scrub as an at-home facial.

More geared toward the kids, though it doesn't look like pumpkins or smell like pumpkins, since it's the pie spices, I recently made playdough that like our scrubs smells good enough to eat.  Super simple and super fast, this no dye playdough will certainly get you in the mood for fall and provide your kids with hours of fun, though be careful to remind them a few times not to eat it.  If you don't have the pumpkin pie spice at home, you could always use a combination of allspice, cinnamon, ginger, and nutmeg and get a similar aroma.

~Have fun and live healthy!

IMG_1436.JPG

Pumpkin Pie Spice Playdough

2 cups of flour

1/2 cup of salt

1/4 cup baking powder

1 - 0.75 oz. container of pumpkin pie spice

2 cups of water

2 tablespoons of vegetable oil

IMG_1433.JPG

1) Add all ingredients to a large sauce pan and mix until combined.

2) Place sauce pan on stove over medium-low heat, stirring frequently.

3) Cook approx. 10 minutes until the dough is formed and not sticky.

IMG_1435.JPG

4) Remove from heat and allow to cool completely before use.  Can be stored in an airtight container.

Mango Cutting Trick

With Halloween on its way, this trick is sure to be one that will get you a yummy treat.

Over the summer, someone said to me that they love fresh mangoes, but hate cutting them, because after peeling the skin, the fruit it so slippery that it makes it hard  to slice up (insert, afraid they're going to cut off a finger) and extract the fruit from the seed.  After posting the Acai Smoothie recipe that called for a mango, I thought I would also share a trick that I learned growing up in Hawaii.  The step-by-step picture tutorial will have you enjoying fresh mango quickly and safely. 

1) Hold the mango in your hands upright with the skinniest part between your fingers.  The seed is oriented in the same position in the fruit.

2) Line your knife up on one side of the fruit about a third of the way from the edge and slice straight down the side of the seed.

3) Repeat on the other side of the seed.

4) Take one of the sides of fruit that you've cut off and score a 1" crisscross pattern in the fruit, being careful not to slice all the way through the skin.

5) Slightly invert the mango so that the pieces are raised.

6) Take a spoon and run in between the skin and the fruit and place mango pieces in a bowl or directly in your mouth :)

Acai Smoothie

I love antioxidants, especially as a boost to my kids' immunity during cold and flu season.  I pack extra ones in smoothies and love that even my pickiest eater, under 2, eats them up, when I know she wouldn't touch Vitamin E rich, antioxidant filled spinach if it was just sitting on her plate.

Topically, antioxidants are especially great in the summer as they help protect skin from sun and cell damage.  We've had it in our seasonal specials - Hunny Ginger and our upcoming Pumpkin Pie body scrubs, as well as our always available Golden Pineapple scrub.  

While blueberries, mangoes, papayas, and spinach have been my go to antioxidants in smoothies, this summer's World Cup got us hooked on Brazil's superfood, acai berries.  They are espoused to be richer in antioxidants than blueberries and so we ventured to try it as a blueberry replacement in our smoothies.  With the upcoming fall soccer season (insert here, is there really an off-season to soccer?), I thought I'd share one of our favorite acai smoothie recipes.

Acai Smoothie

Package of frozen acai berries (~3.5 oz)

1 mango

1 banana

Handful of spinach

1 Tbsp Honey

1 Tbsp Chia Seeds 

Pineapple Juice (Amount depends on preferred consistency)

Blend until smooth!

1001 Origami Cranes for Bon Festival

Some of you may have noticed that there's been a summer hiatus from the blog.  Part of the reason was to enjoy time being present with my ohana (family) and another part was the time I spent folding origami paper cranes.

The simple reason behind starting Wailani's in 2013 was that I wanted to focus on health and happiness.  Using all natural and organic ingredients, combined with the aromas of Hawai'i, balanced out what I was doing in sharing Hawai'i with my children, preparing healthy meals for my family, focusing on exercise, etc.  The bigger emphasis for why I started the business in 2013 was that my 68-year-old father had recently moved to a nursing home.  Obesity, diabetes, cancer, strokes, and finally dementia had all taken their toll and I really felt a need to focus on my family's health and teach my children to value being happy and healthy daily.

At the beginning of 2014, my dad died, something which you are never quite prepared for, even if you tell yourself that you expect the inevitable.  When I found out that the Bon Festival, a Japanese tradition celebrated in Hawai'i to honor the spirit of a person's ancestor, was August 13-15- coinciding with my parents' anniversary, I knew I needed to fold the 1000 origami cranes to honor him.

For those that don't know the popularity of the origami cranes, also known as senbazuru, there is a wonderful book about Sadako Sasaki, a Japanese girl that died from her exposure to the atomic bomb at Hiroshima.  She was trying to fold the 1000 cranes because she was inspired by the legend that the person who folds these cranes is granted a wish.  She died before completing the cranes and her classmates completed the rest in her honor. 

In modern times, the cranes are made for many occasions, such as weddings, funerals, birth of a new baby, praying for peace, etc.  I remember helping to fold cranes in grade school to send off to the Hiroshima Peace Park.  Each year, people place cranes there during the Bon Festival in memory of their ancestors.

Thanks to a friend of mine and my husband that helped to fold the cranes, I was able to complete the 1001 cranes...yes my friend said that the extra one is for luck...and give them as a gift to my mom for her anniversary, during the Bon Festival. 

I am happy I got to honor his memory and teach my children more about the traditions I grew up with in Hawai'i, though my son is only at the stage of being able to fold a paper airplane :)  Thanks for supporting me through this adventure of Wailani's and reading about my summer journey with cranes and commemoration.

~Have fun and live healthy! 

Have an Eggcellent Mother's Day!

There is no greater joy than spending time with the kids on Mother's Day, though every day I laugh and smile with the kids feels like Mother's Day.   We recently enjoyed a wonderful family breakfast adorned with wild flowers my daughter and I picked on a walk with our dogs. 

My keikis (kids) are getting old enough that they want to help in the kitchen.  It might be a little messy, but cracking eggs for cheesy omelettes are one of their favorite activities.  While I can't get them to let me put diced veggies in there - YET - I have been adding ground ginger, which I talked about in our Quinoa Salad with Chicken recipe

As a pregnant mama, I loved ginger for nausea; as a post-pregnant mama I loved it for pain and inflammation as I was trying to get my body back in shape; and as a mama of three, I love it for treating colds and flus in the family.  It's also great for anyone suffering from arthritis or gout.

The best part about adding this to scrambled eggs or omelettes is that you can put it in and it doesn't change the flavor, so even the pickiest of kids won't notice it. 

Wishing you all a Happy Mother's Day!

Vegetable Soup

I absolutely love using Wailani's scrubs for the great topical applications, such as reducing the appearance of stretch marks or calming inflamed and sore muscles from a tough workout, but secretly one of the things I love is that it reminds me to include the healthy ingredients in my family's meal plan.  The fact that it makes my shower smell like Hawai'i doesn't hurt either.  As the wife of a soccer coach, mother of three, and native of Hawai'i we've used ginger in our house both topically and in our food to help with inflammation and nausea and just because it tastes ono (good). 

I'm using it everything from the scrambled eggs to smoothies and juices.  In our Good Fish Friday recipe, we shared links to just about every other recipe we've shared with ginger, just in case you can't get enough of it.  With our spring special body scrub coming out this week, Hunny Ginger, I thought I'd share a yummy soup recipe that includes ginger and turmeric, both known for their amazing anti-inflammatory properties. 

As you might recall, our Golden Pineapple Body Scrub's beautiful coloring is derived from organic turmeric and so I'm excited now to round-out the anti-inflammatory regime with a scrub that includes ginger essential oil. 

Don't be scared of the long list of ingredients.  The recipe is simple to prep and pull together.  This recipe can feed a crowd, so if you know any expectant mommies out there, a container of soup and a Hunny Ginger Body Scrub make a great Mother's Day gift.  Check out our specials just in time for summer!

Vegetable Soup

2 russet potatoes, peeled and cut into 1/2 inch pieces

20 baby carrots cut into 1/2 pieces

4 celery hearts cut into 1/2 pieces

3 leeks, white and green parts only, cleaned and cut into 1/2 pieces

1/4 cup coconut oil

64 oz. vegetable stock

1 tsp salt

1 tsp black pepper

1/2 tsp crushed red pepper flakes

1/2 tbsp onion powder

1 tbsp ground ginger

1 tbsp ground turmeric

28 oz. can whole peeled tomatoes in juice

2 medium zucchini cut into 1/2 in pieces

1 15-oz. can cannellini beans, rinsed and drained

2 cloves garlic minced

2 tbsp dried parsley

1/2 c freshly grated parmesan cheese and rind

IMG_0483.JPG

1) In a large stockpot, heat 1/4 cup coconut oil over medium heat.  Add cut potatoes, carrots, celery, and leeks.  Stir occasionally for 5-7 minutes.

2) Add vegetable stock, salt, black pepper, crushed red pepper flakes, onion powder, ground ginger, ground turmeric, and canned tomatoes with juice.  Reduce heat to medium-low and simmer for 10 minutes.

3) Add zucchini, beans, minced garlic, parsley, and grated parmesan cheese and rind.  Reduce heat to low and cook for at least 1 hour to allow flavors to combine.

4) When you're ready to serve, either mash the whole tomatoes with a potato masher, blend with an immersion blender, or transfer tomatoes and some vegetables to a blender and blend to smooth then return to the soup mixture.

5) Serve sprinkled with additional grated parmesan cheese alongside a salad or a piece of crusty bread.

Good Fish Friday

I know I promised a salmon recipe two weeks ago, but having fun on an impromptu family bonding experience came up and now I find that it was the last Fish Friday of Lent, Good Friday.  With the start of summer, this low and slow grilled salmon recipe won't have you waiting until next Lent to make it.

Another great thing about the timing of this recipe is one of it's star ingredients is the key to our upcoming seasonal special in honor of Mother's Day- Hunny Ginger.  I've talked about ginger in the past as a great anti-inflammatory for athletes or others suffering from arthritis or gout in our Edamame Hummus recipe.  You'll also notice that it was in our Ahi Tuna recipe and Malika Dudley's Surfer Girl Sorbet.  I also had it in our Protein Party quinoa and chicken recipe, and mentioned that I love adding it to my family's scrambled eggs, as it doesn't change the flavor profile.

Even though I had this meal twice during Lent, this is definitely on my upcoming menu plan.  Hope you enjoy and keep a lookout for information on our seasonal special Hunny Ginger, with great tips on our facebook page about the topical benefits of ginger essential oil.

Low and Slow Grilled Salmon

Skinless salmon either frozen or fresh and have the butcher remove the skin

Soy Sauce or amino acids

Fresh ginger root

Ground ginger

Granulated garlic

Alderwood smoked sea salt

Cedar plank or misquite hardwood chips for a charcoal grill

1) Use a pan to marinate the fish.  Place salmon in pan and smash and squeeze ginger root over the fish, flipping to cover both sides.

2) Rub all dry ingredients to cover fish on both sides and pour soy sauce on the fish.  Leave to marinate at least 15 minutes.

3) Heat one side of the grill on low. 

4) Place marinated salmon pieces on cedar planks on the side of the grill with no heat and close grill.  Cook for 30-45 minutes depending on thickness of the salmon.  (Alternatively, you would place the salmon directly on a greased grill using the hardwood chips- again on the unheated side.)

Bucket List

We've all probably made one at some point in our lives...dreamed of the 100 things we want to do before we die.  But how often do we make plans to live our dreams?!  I know that having kids was on my bucket list and even though I have three now, I haven't bothered to dust off the list and check that one off-as if the business of living has made the once imagined list of adventures another chore on the to do list.  

This last week, through a generous serendipity from my cousin's blog and her giveaway for the NCAA, I was able to cross off an item from my bucket list- going to a national championship game for my college team-and in doing so experienced an even greater gift...

When my cousin first told me I got the tickets, she asked if I was bringing my husband.  A nice idea for certain, but he was away on a trip.  When I called to tell my husband, he was surprised I was even considering going to a game that was over 9 hours away and when I told him I'd be taking our four-year-old son, he may have asked if he was still talking to his wife.  Apparently this mom of three is not known for being a spontaneous adventure-seeker.

When I put the game on my bucket list, I envisioned crowds of people clad in school colors, the familiar sounds of school fight songs, close shots, and edge-of-your-seat plays that bring you to your feet cheering.  The semi-final and final games were that and more; but I didn't expect the greater gift of sharing this first national championship game with my son.

Every little aspect of his personality shined from his excited response of, "No, we have tickets," to every street vendor shouting out "tickets" between the parking and the arena, to his repeated questions about the game and who was scoring.  And he could have melted my heart at midnight when he awoke and told me he was mad, "Because our team didn't win."

But, quite unexpectedly, one of the best parts was our 10 hour drive home, talking the whole time.  We talked about family and friends we had missed, toys we wanted to play with- but that only gets you a couple hours at best.  After taking a break to eat, we tried eye-spy again, though it got a little boring. So, we turned to an old classic where he would say letters of the alphabet and we'd find them on signs.   

We tried telling jokes for awhile, but apparently we don't know that many between us.  At that moment, I started thinking my husband may have been right when he said we should've purchased a video system for the car.  But then I got creative and we started playing guessing games. We took turns describing animals and the other person had to guess the animal.  He was surprisingly sophisticated in his descriptions, being careful not to give away the answers.  This went on for almost an hour before we switched to superheroes, then back to animals before we tried food (which was slightly problematic because we got so hungry we had to stop for a snack). 

Before I knew it, we had filled up the better part of the last 4 hours with our car games, laughing at all the silly words we would say and the even sillier jokes we would try to make up that really weren't funny at all.

I thought I was taking this trip to cross an item off my bucket list and what I really did was build an even better relationship with my son- an adventure I want to go on every day. 

~Have fun and live healthy

30 Day Fitness Challenge

I originally had a salmon recipe to share with yummy pictures, but I completed a 30 day fitness challenge today and thought I’d share some of the blessings I had this last month for focusing on my fitness and I'll save the salmon for next week’s Fish Friday.

After 3 kids, my body has taken on a whole new shape.  My feet are even joining in the fun and are a full half-size bigger, which I knew was to be expected.  There are other things however that I didn’t expect, like my once poker-straight hair now being curly on half my head.  I can’t decide between straightening half of it or curling the other half, so my solution is usually a pony-tail.

But back to my post-babies body.  My friend Stefanie wrote an empowering post about all the ways that pregnancy changes your body and how important it is to embrace your post-baby body.  While I do have some pre-pregnancy pants that are in my closet daring my hips to ever come back together to fit in, my motivation for working out and completing the 30 day challenge was literally to try and work muscle groups that I know had been ignored since I was marathon training 5 years ago. 

I am a person that works better with a long-term goal and has a plan that tells me what to do each step of the way so that I keep myself accountable to doing it.  If I’m left to my own decision to just go for a run or do some squats or whatever, I’ll always find some excuse of an unfinished load of wash, dishwasher to empty, etc. to not get the workout in. 

Going from occasional workouts to something every day for 30 days was an exciting challenge and I don’t know if my daily attitude of gratitude I’ve been doing for Lent has fueled my passion to workout or if working out has fueled me to be more grateful. 

During the 30 days, there were times felt dumb for not knowing how to do some of the workouts, froggie anyone?...but then loved my feeling of accomplishment when I found the YouTube video and tried something new, though I may not be in love with froggies (Seriously, you’re going to look-up that YouTube video now aren’t you?). 

To be expected what I loved is that the workouts were effective.  Soreness meant growing stronger and the level of challenge was high.  Over the process, somewhat unexpectedly, vicarious learning started happening with my kids. 

Now, I know kids learn what they see from my post on my son riding his bike down a hill the day he learned to ride without training wheels and my husband calling me out on my fear of riding bikes, but I never really focused on the seeing part.  In the past, my husband and I would tell the kids we were going to workout, going to the gym, etc.  We want them to know we value this and it’s important.  And we are certainly active with them, but have done less formal exercising with them, apart from soccer drills.  This past month has been a daily dose of my kids seeing me do all sorts of new exercises and then start trying them themselves. 

Now, even when I go back to hitting the treadmill at the gym or long runs outside, I want to remember to do exercises at home with the kids so that the value of exercising is more than just words. 

Fancy Fake-Out

Just because I have three kids aged four and under doesn't mean I don't have time to think about presentation...it just means I usually don't have time.  I love this edible salad bowl that I've been making for years because even if you don't have time, you can make this in less time than it will take you to read this blog.  Seriously fast makes this a fancy fake-out and it even got an 18-month-old to eat some salad- a winner for dinner parties or just making the weekly meal something new and enticing.

Edible Salad Bowl 

Shredded parmesan, romano, and asiago cheeses

Coconut oil

Note: I've used just parmesan cheese before, so whatever you have on hand is fine.  Just make sure it's shredded and not grated.  You can also use olive oil instead of coconut oil, but you know me, whatever excuse I have to add coconut oil to my family's diet, I do.

1) Heat ~ 1/2 tsp coconut oil in a small frying pan over medium heat.

2) Once the oil is melted and spread over the pan, sprinkle the shredded cheese in an even layer to coat the pan.

3) The cheese will start to melt and bubble and you will start to see the edges turn brown. 

4) Once all edges are turning brown, remove the pan from heat and place a small bowl in the middle of the pan.

5) Cover the bowl with the top of a plate that is larger than your frying pan and flip over, setting the bowl and cheese on the plate to dry.  (Be careful when flipping.  If you used too much oil, it may drip down, which is why it's important that your plate is larger than your frying pan)

6) Let the edible cheese bowl dry on your bowl for a few minutes and then remove the cheese bowl.  Looks a little like coral in the ocean, doesn't it?

7) Fill with your favorite salad.  Holds up well to salad dressing, but it's best if you plan to serve the salad right away.  Unlike the below picture, you probably don't need extra cheese on the salad.  My kids just love cheese.

~Have fun and live healthy!

Choosing Courage Over Fear

I love that I've become known as the mom who will bring fruit to the class parties.  I also couldn't have been more proud when I asked my four year old what he wanted to bring for his monthly snack day at school and he replied with Strawberries.

As a parent, I love feeling like my values are rubbing off on the kids. But I also know that means if I'm not being an example for them in a certain area, that too is going to get noticed.  And for the last two years, my husband has been bugging me to get on a bike so that our kids would want to get on bikes.  I have been using the excuse that we have so many little ones that someone needs to get pushed on a tricycle or that they won't notice because dad's riding and that can be their motivation.

My only real excuse is fear.  I've turned it into a good laugh at how uncoordinated I am on a bike, but really, when you run into a parked car, oncoming traffic, and a fire hydrant, riding a bike becomes the last thing you think of doing.  Lack of confidence is definitely not something I want rubbing off on my kids.

So you can imagine my anxiety last summer when my four year old, while dad was away, decides he wants to learn to ride without his training wheels.  How was I supposed to teach him when I can't really even do it myself?!  I mean, I had to think about how to even get the training wheels off.  Thankfully, his neighborhood friends were a big help.  He watched them and what they were doing and after a few pushes and topples, magically gets it.  Excitement and pride filled my heart, until his desire to follow in his friends' bike tracks led to him standing with his bike at the top of a steep driveway saying he wanted to ride down. 

As fear flooded back in followed by visions of him with bloody scrapes, I was reminded of a quote I'd read about teaching your children to choose courage over fear.  Only I realized that it wasn't my kids that had to be taught that lesson, it was me.  His bravery gave me courage to not teach him fear.  I chanted under my breath as a I let him go from the top of the hill, like a prayer mantra, "Courage over fear, courage over fear, courage over fear..."

Choosing courage over fear is something I'm so grateful for learning from my kids...a lesson that I'll continue to learn as a parent.


Wailani's-Czlonka-What?!

item29.jpg

If you're following Wailani's on Pinterest, you're bound to have noticed my name as the founder, Lisa Czlonka, and maybe thought, what a strange assortment of names.  So, in honor of March 4 being Unique Names Day, I thought I'd give you a little satirical insight about the names behind the business that ends with a heartfelt lesson about motherhood.  Hope you enjoy!

~Have fun and live healthy

You're More than a Name Baby

From a young age, I thought life shouldn’t be a Spelling Bee.  My maiden name was E-A-K-M-A-N.  Go ahead, say it aloud, is that Eekman or Eckman? If you said Eckman, you’re right. You’re in the minority, but you’re right.

Then, at some point in college, I realized I might be able to trade-up and not have to spell my name every time I said it. BUT then I got married…bum bum bum…C-Z-L-O-N-K-A, ZZZ-lahn-ka.  Yep, somehow I found an even harder last name…and I promise you I was not secretly saying, “Challenge Accepted.” 

After I got married, I would literally tell people, after spelling it out-loud over the phone several times to just put down Smith.  Who cares if my husband’s cousin was former NFL player Larry Csonka and my husband went to family reunions with him growing up?…That guy’s part of the family tree started changing consonants to try to make sense of it all, so why shouldn’t we? I just kept thinking over and over that my kids were going to be plagued with the same fate I went through of finding animals to spell out their name…C as in Cat, Z as in Zebra, L as in…okay, you get the point.

But, what I’ve failed to share to this point is that I’m from Hawaii.  I realized what a ridiculous level this has all reached the other day when I was buying something from a vendor over the phone for my Hawaiian business, Wailani’s, with a Polish last name, Czlonka, in a Cherokee town, Tahlequah. Thank goodness everyone knows Oklahoma… “where the wind comes sweeping ‘cross the plains.”  All my vendor could say was, “Wow!”   

Seriously though, I spent so much time spelling on the phone the other day that I was almost banging my head against the wall wondering why I didn’t just tell my vendor that I’d email them the information, like I usually do, because getting them to tell me their email had to be easier than some sort of combination of Hawaiian, Polish, and Cherokee, right? Right!  Plus, I was spelling all that information while I had two sleeping kids at home, hoping they wouldn’t wake as I got a little louder each time I was trying to spell things out.  As a mom of three kids aged four and under, I get my business done whenever I can and efficiency does not equal spelling out Czlonka every time I say it.

But, lest you think I’ve learned my lesson, I need to divulge that all my children have Hawaiian names.  Why is this an issue, you may ask?  Well, in case you don’t know, the Hawaiian language is based on the English alphabet, but only uses 12 letters, including all the vowels!  Yep, that means only 7 consonants.  So I’ve got a last name with a lot of funky consonant combinations, and I’ve plagued my children with names that blend all sorts of vowels in interesting arrangements…Kekoa, Ke’alohilani, Kona’ihilani… 

I bet you’re now wondering how a Czlonka (if you can even remember how that’s pronounced) could do that to her kids and how in the world those kids are supposed to learn how to spell their names.  I assure you I was not trying to provide an unlimited source of humor when my kids get called at the doctor’s office, though the scene usually involves a nurse’s assistant opening the door, looking down at the file wide-eyed and then just staring for a couple minutes until I stand up with my kid. Seriously, it happens every single time.

So, what am I trying to do here - make my kids spelling champs? No. Maybe see if my daughters could find more challenging married names than their maiden name? No. Oh, I know, get everyone to stare on the soccer field when I three-name my daughter – Ke’alohilani Michaela Czlonka – as she’s trying to run on the field to join her big brother while the game is going on? No.

What I realized when I became a mother is that it’s not important to make yourself easier for the masses to understand.  The people that really love you and that are important enough in your life will always take the time to figure out how to say your name. 

I know this isn’t rocket science, but it was to me.  When I became a mother, I stopped caring what people thought and realized a little more what unconditional love meant. The other day, I heard myself tell my daughter: Take a deep breath.  You are a Czlonka woman.  We are brave, strong, smart and beautiful. Just like our name.

Listen to your mother. Don’t wish away your name wanting to be amongst the crowd. The friends that care to become spelling champs just to say your name are the ones worth keeping. They are the ones that care about you to know more than just how to pronounce your name, they care to know you. And those are the real relationships that matter in life.

Inside Out Burger

Excited to end these two months of recipe shares with a family favorite.  And even though it's not summer yet, I couldn't help but bust out a grilling favorite, the burger, by using my stove-top grill pan. 

I've actually been making these inside out burgers for over a decade, but this isn't something I make for a large crowd, so only close friends and family have tried them.  So as not to discourage you, I'm just going to include a few more pictures to illustrate the prep and you'll can see why it's something geared more toward a small gathering than feeding a college soccer team.

DSC_0069.JPG

The inside out burger is nothing new...a burger stuffed with cheese.  Emeril debuted it on the Food Network Channel when I was first teaching myself to cook.  So it doesn't take a ton of skill, just extra attention to prep and making sure it gets cooked all the way through.  It's been redone by others to stuff the burger with favorite toppings, such as sauteed mushrooms and onions, but that may mean an even longer prep time.  Once you try it with cheese however, you can get creative with anything you like, such as bacon, jalapenos or spinach and feta, and really make this recipe your own.

The part that's different from Emeril is my secret ingredient that's added to the meat.  If you loved the Secret Ingredient Steak, then you'll love this recipe as well.  Remember that the seasoned alaea salt is a mix with over 10+ ingredients, so I buy it mixed instead of making it myself.  Using plain alaea salt will definitely not give you the flavor profile that the seasoned version will and since you're using it in both the steak and burger recipes, you'll get  a lot of great use out of it.

DSC_0060.JPG

Inside Out Burger

Serves 6

~2 lbs ground beef

1 egg yolk

1 1/2 Tbsp Seasoned Alaea Salt

1 Tbsp Worcestershire

Your favorite cheese: I used blue cheese crumbles, provolone, and monterery and colby jack

1 Tbsp coconut oil for the grill

Buns and your favorite toppings and condiments

1) Combine the ground beef, egg yolk for binding, seasoned alaea salt, and Worcestershire in a  large bowl being careful not to overmix.

2) Spread the meat evenly at the bottom of the bowl and using a trick I learned from Rachael Ray, score the meat into 6 equal pie shaped pieces.  This helps to make sure that your burgers are evenly sized for consumption and cooking time.

DSC_0062.JPG

3) Take each section and divide it in two in your hands and form patties for both, making them slightly thinner in the middle for a well for the cheese.  Stack the pair and set aside until you have 6 stacks of two patties each. 

DSC_0063.JPG

4) Take one patty and fill with your favorite form of cheese, staying in the middle.  Take the other patty and place it on top and mold the edges to ensure a seal.  Fill all burgers.

DSC_0064.JPG

5) Bring a grill plate to screaming hot temperature, placing a Tbsp of coconut oil or your favorite cooking oil to ensure the burgers don't stick.

6) Cook on each side for 6 minutes, placing a lid to partially cover the grill plate to help the meat cook through.

DSC_0067.JPG

7) Serve on a bun with your favorite toppings and condiments.

~Have fun and live healthy

Edamame Hummus

When I was pregnant, I loved snacking on hummus with raw vegetables, as chickpeas are a good plant-based protein.  My favorite was red pepper hummus and it was one of the only kinds my husband would eat.  Years later, it took a road trip and some fun times with friends to be introduced to Edamame Hummus.  Of course, when we fell in love with it, there was only one problem...I couldn't find it anywhere in my hometown.  So, I decided to make my own...which of course means I'm sticking one of my favorite ingredients for heart health in there- Coconut Oil.

DSC_0051.JPG

Before I get to the recipe, let me tell you a little more about what I love about some of the ingredients and why I loved that my kids gobbled it up.  Both chickpeas and soybeans (edamame) are in this recipe, which means a great source of both protein and iron.  Iron deficiency can definitely be a risk for many women late in pregnancy.  What's important to remember is that your body can better absorb iron with the aid of Vitamin C. The Vitamin C alone in soybeans isn't enough, so I've added Lemon Juice in the recipe and recommend pairing the hummus with a great source of Vitamin C, like raw bell peppers.  I've also got ginger in there, which is a great anti-inflammatory for athletes with pain and inflammation or anyone with arthritis or gout.

~Have fun and live healthy!

DSC_0054.JPG

Edamame Hummus

3 cups cooked Edamame in shells

1  16-oz. can Chickpeas, drained

1 clove Garlic

1/2 tsp Wasabi

3 Tbsp Coconut Oil

3 Tbsp Lemon juice

1 Tbsp ground Ginger

1/2 tsp ground Cumin

1/4 tsp ground Coriander

1 tsp dried Parsley

1/4 tsp Sesame oil

1/2 C Water

  1. De-shell the cooked edamame and place in a blender along with the other ingredients (except water). 
  2. You can loosely chop the garlic clove for better distribution. 
  3. Use the coconut oil in it's solid form in the blender (since you'll be refrigerating any leftovers). 
  4. Add 1/4 cup of water and blend on medium.  Continue to add up to the full 1/2 cup of water for desired consistency. 
  5. Serve with your favorite hummus side, such as bell peppers and other raw vegetables or pita bread.


Protein Party

You think I'd invited the soccer team over for my recipe this week, because it's protein packed and can feed an entire team. In addition to the protein that's so great for athletes, this recipe would also be good to share with friends that have a new baby or friends that could just use a little support and love of a nice meal from a good friend.

Let me tell you about what I love about some of these ingredients in my quinoa salad with chicken before I get into the recipe. 

DSC_0042.JPG
  1. Quinoa: It's a complete protein that provides you with all 9 amino acids and it's gluten free.  So why the chicken then? Well I'll be honest.  I usually share recipes that everyone in my family loves to eat.  No matter how I've prepared it, my kids just don't like the texture of quinoa.  I'm not going to stop trying, but I'm also going to make sure they're getting their protein.
  2. Black beans: My kids loved the black beans in the salad and I love it because they're high in iron, along with folic acid and protein.  Get why this recipe is protein packed?!
  3. Bell pepper and lime juice: Love the Vitamin C I get to boost my family with during cold and flu season.
  4. Ginger: Excellent anti-inflammatory. I was just introduced to using it in my scrambled eggs and now I more bravely trying to add it to as many recipes as possible.
  5. Coconut oil: You knew I wasn't going to leave this one out.  It's heart healthy, improving cholesterol ratios, and can improve metabolism.  
DSC_0043.JPG

In case this isn't enticing enough, the added benefit is that you can make enough to feed a party in 30 minutes (as long as you have the black beans cooked ahead of time or you're using canned beans). Healthy meal to make a crowd happy in half an hour, yes please!  Hope you share the LOVE this Valentine's Day!

DSC_0048.JPG

Quinoa Salad with Chicken

INGREDIENTS

Chicken:

1 chicken breast per person

Salt and pepper

Quinoa Salad:

1 box quinoa

2 cups of cooked black beans or 1  14 oz. can drained and rinsed

1/2 cup frozen corn, cooked and cooled

2 roma tomatoes, diced

1 orange bell pepper, diced

1 tbsp lime juice

Dressing:

6 tbsp lime juice

2 tbsp red wine vinegar

4 garlic cloves, roughly chopped

1/2 tbsp ground ginger

1 1/2 tsp chili powder

1 tsp cumin

1/2 tsp coriander

1/2 tsp Hawaiian or Alaea salt

2 1/2 tbsp dried cilantro

1 tbsp honey

3/4 cup coconut oil, brought to liquid form

DIRECTIONS

  1. Prep your salad items that need dicing, cook frozen corn kernels, and reheat pre-cooked black beans.
  2. To cook quinoa, use a 2:1 ratio of water to quinoa in a medium saucepan.  Bring to a boil then reduce to simmer and cook 10-15 minutes or until all water is absorbed.
  3. While quinoa is cooking, pound each chicken breast  to 1/4-1/2 inch for fast cooking.  Season with salt and pepper and grill until cooked.
  4. Combine all ingredients in the dressing together in a blender, except for the coconut oil.  Once blended smooth, slowly add the coconut oil to combine.
  5. Once quinoa is cooked, place in a large serving bowl, add 1 tbsp lime juice and mix.  Then add all other salad ingredients and mix until there's an even distribution.  Once combined add the dressing slowly, mixing in between to make sure all parts are covered and absorbed.
  6. Top with chicken or serve on the side. 

Granola for your Greek

My kids love yogurt and I can't help but want to swap in Greek yogurt for its higher protein properties.  There are a lot of options out there now, even ones that come with fruit, to sweeten up the more sour taste of plain Greek yogurt, but it's not usually the yogurt my kids want to finish...until now.  When I get both "I like this" and "I want more," I know I've got a winner.  I also love that I can control the ingredients and add in some of my hidden favorites like coconut oil and bananas for potassium. 

DSC_0037.JPG

Baked the night before, it's sure to make my breakfast routine for the kids fast and protein-packed.

~Have fun and live healthy!

DSC_0041.JPG

Granola for your Greek

1/4 cup coconut oil

1  1/2 cups old fashioned oats

3/4 cup chocolate chips

1/2 cup finely chopped pecans

1/2 cup shaved coconut

2 bananas

1 tsp vanilla extract

1) Preheat oven to 325 degrees

2) Smash bananas in a bowl and combine with all ingredients. There's no need to melt the coconut oil as it will soften as you stir. 

3) Line a cookie pan with foil and spread the mixture evenly across the surface.

4) Bake 50 minutes, remove, and cool. Crumble and use on your Greek yogurt.  Other great uses are additions to your favorite cereal, topping for ice cream, or a crunchy top to a smoothie.

Ahi Tuna

My food philosophy is that I love cooking healthy foods that my family LIKES to eat...which is easier said than done with 3 kids aged 4 and under.  I'm very happy that all three kids will eat fish, because it's a protein that is low in fat and cooking is so fast.  In particular, I like ahi tuna, a fish high in Vitamin B, because I can do so many things with the leftovers.  I make extra and use it the next day either as the protein in a salad or on a sandwich. 

DSC_0013.JPG

Before I get to the recipe, I wanted to give a few hints on replacement options, in case you don't have one or more of the ingredients in the recipe:

  1. I included Hawaiian salt, the same I use in my Kalua Pig.  I could get it in the local grocery store when I lived in Rhode Island, but I buy it online now.  An alternative would be Alaea salt which is the base of one of my favorite seasonings for my Secret Ingredient Steak and with over 80 minerals and elements it's one of the star ingredients in Wailani's Salty Hibiscus Body Scrub.  Alaea salt is also similar to the more readily available Pink Himalayan Salt. 
  2. I was lucky enough to have a meyer lemon on hand, which is actually native to China and so I used it in the recipe that I'm sharing on Chinese New Year.  But clearly, you can use regular lemon zest or dried lemon pepper. 
  3. I used an applewood rub, but Yakima applewood smoked sea salt is another option.  Black pepper instead of white.
  4. You could also add sesame seeds (regular or blacked), but my kids just don't like that added texture.

I think you get the idea, substitute as needed to fit what you have on hand or use more frequently from your pantry.

Enjoy and continued wishes for a prosperous and healthy year or in Chinese: Kung Hei Fat Choi!

DSC_0014.JPG

Ahi Tuna

Coconut oil

Meyer Lemon zest

Granulated garlic

Hawaiian salt

Ground white pepper

Applewood rub

Ginger powder

Fresh Ahi Tuna Steaks

Melt coconut oil and rub on both sides of the fish.  Sprinkle equal amounts of all other ingredients to cover both sides and rub in. Let marinate for 10 minutes.  You can't put them back in the fridge for marination because the coconut oil will re-solidify.  Bring the grill to high heat and cook 4-6 minutes per side depending on the thickness and desired wellness.

Vitamin C U Later Sickness Smoothie

It seems like everywhere you turn this time of year, there's someone you hear about that has a cold or the flu.  And if you've got an earache coming on, you'll definitely want to try the audiologist recommended tip I've shared on melting coconut oil, placing a few drops in your ear and leaving it in your ear for 15-20 minutes- antifungal and antibacterial properties. 

My family was sick after the holidays so since then I've been pumping them up with Vitamin C with one of my favorite sources...Pineapple.  Not only does it have more Vitamin C than an orange, but it also is an anti-inflammatory, which helps you to recover faster from a workout and is why it's good for people with arthritis or gout.  Plus, there's no simpler way for me to get nutrients as smoothies, great for a meal replacement on the go or for the kids to get involved in the kitchen and eat up their vitamins in real food.

In addition to my love of Pineapple, you know there's going to be some coconut in there (because it's just a superfood) and if you remember from my Immunity Packed Pumpkin Smoothie, there's also going to be some of my other favorites.  There's another boost of anti-inflammatory from spinach, a great source of plant-based protein providing your body with energy.  I even get some omega 3s in there for heart health with ground flax seed.  I will give you a quick side note here before getting to the good stuff.  I interchangeably use chia seeds and flax seeds for heart and digestive health, but used flax seeds here for more of the aesthetic purposes. If you're looking at boosting protein, you should include chia seeds in your diet because they're a complete protein.

DSC_0008.JPG

Last couple notes on the smoothie.  If you're lucky enough to grab a fresh pineapple and let it ripen, I definitely recommend that.  If it's not too ripe, you can always add a teaspoon or two of honey. Also, if you really wanted an extra boost of vitamin C, you should probably replace the spinach with kale, in which case I would definitely recommend the honey.  And finally, if you want something a little thicker, add some ice.  I wanted something my 16-month-old could suck up a straw, so it was a little on the juice vs. smoothie side.

~Have fun and live healthy!

DSC_0009.JPG

Vitamin C U Later Sickness Smoothie

~Makes approx. 32 oz.

1 can Pineapple in juice

1 can Coconut milk

1 handful of Spinach

1 Banana

1 Tbsp Lime juice

1 Tbsp ground Flax seeds

Place all ingredients in the blender until combined.  Enjoy!

Secret Ingredient Steak

So for some special occasion recently when my husband and I had a date night, because 3 kids aged 4 and under make that a novelty, I asked him if he wanted to go to the local steak house.  When he said no, I got worried he wasn't feeling good.  This is a man that likes to eat meat with a side of meat and have meat for dessert.  Then he gave me the best compliment ever about my cooking, or he was just buttering me up to stop pushing vegetables on him.  But anyway, he said that I marinate the best steak ever so there's no reason to go get steak anywhere.  In case you think he's biased, I do have a relative that told me I should bottle the marinade and sell it, but I thought it was too simple: 3 ingredients couldn't get any easier.  Still, I haven't shared the recipe until now just to keep an illusion of gourmet when I make it for others.

But I'm going to let you in on the secret, which Wailani's and the steak recipe have in common- Alaea salt.  I'm sure many of you have heard of the trendy Pink Himalayan Salt.  I love the idea of 84 minerals and elements, but prefer to support the great products of the USA and since Hawaii's Alaea salt has 80 minerals and elements, I don't think I'm missing out on too much.  These great nutrients have wonderful consumption as well as topical benefits, which is why I use it in the Salty Hibiscus Body Scrub.

DSC_0591.JPG

While the Alaea salt in the Scrub is the plain version. I use a seasoned mix in the recipe.  And to keep it super simple, I buy the Seasoned Alaea Salt and don't mix it myself.  To give you an idea of just some of the seasonings in it that add the awesome flavor to this steak, there is Alaea salt, garlic, parsley, pepper, thyme, cumin, paprika, and crushed chili pepper.  See, this would sound like a really complicated recipe if you were mixing the seasoning yourself, but since I'm not, I just call it my amazing secret ingredient that takes your steak to the next level.

DSC_0791.JPG

Secret Ingredient Steak

Seasoned Alaea Salt

Brown Sugar

Worcestershire Sauce

Steak

Pick your favorite cut of steak (pictured is Filet Mignon).  Rub equal amounts of Seasoned Alaea Salt and brown sugar on both sides of the meat and drip Worcestershire sauce on both sides to cover the surface of the steak.  Let sit for 30 minutes.

DSC_0793.JPG

Grill to desired wellness.  Pictured is medium to medium-rare and for the thickness of the steak was grilled on high 4-5 minutes per side.

DSC_0797.JPG